
$59+ SHIPS FREE! (USA)
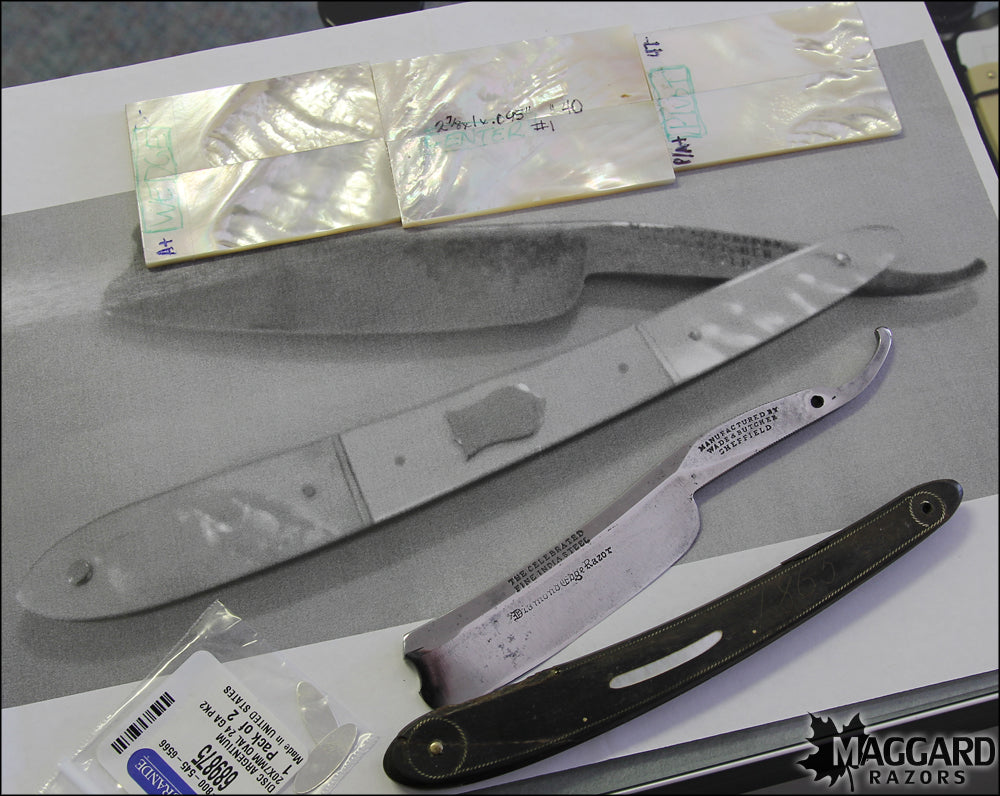
 My customer sourced some beautifully figured, A+ Grade Mother of pearl, and shipped it to me along with some small silver engraving plates and the razor:
 Upon inspection, I noticed a date scratched into the horn scales - 1865. There was also some wonderful wound silver wire inlay, along with a small MOP inlay in the center of the scale.
 Although a tragedy to see cracked scales like this, at the same time it is an honor to bring this razor back to former glory (AND THEN SOME!!!). So, I began to devise a plan. Upon talking to the owner, it was clear that he wanted to maintain the original scale shape. I wholeheartedly agreed :) So, the first step was to establish a base material. Instead of using Silver, we chose to use Nickel sheeting. It will not rust, and can be polished to a brilliant shine. Step one was cutting out some of the material.

 Once I had the two rectangles of sheeting cut out, I traced on the scale shape.
 And then I trimmed up the two pieces fairly close to my trace lines.
 After I had my two rough pieces of Nickel cut out, I taped them together using ShurTape Double sided carpet tape, ensuring to line up the traced patterns as accurately as possible.
 Once together, I continued shaping and profiling them, until I had a reasonably close match to the original (A little slop on the edges is always nice before final shaping). I also took another trace of the original scale, and I planned out the paneling. I measured 7mm on each side of the panel dividers for the panel fastening pins. Everything is very accurately measured on the paper template.
 After I planned out the panels, I superglued the paper right on to the two pieces of sheeting. This gave me a perfect template for the next step.
 I drilled all 6 holes with a 1/16" bit on my drill press. Here you can see the opposite side from the side that I superglued the paper to.
 After that, it was time to plan out each individual panel.

 Once they were planned out, I carefully began to shape each piece, initially with a band saw, and then switched to a belt sander. Here is one of the pieces, shaped within reason (always leaving some excess hanging off the sides!!!). You'll also noticed that I have roughed up the surfaces of the MOP and the nickel sheeting in order for Epoxy to hold well. I used a 100 grit sandpaper for this.
 Since the other side still has the paper template, I know EXACTLY where to epoxy the MOP to the nickel. Here I am lining things up / test fitting to ensure my MOP is correctly sized.
 Here, we see the first piece clamped. I made sure to constantly remove the epoxy from the edges on the sides before it dried. That way I will be sure to get a good, flat fit for the other two panels (no excess epoxy)
 Next, I cut a small piece of nickel sheeting and flattened one edge. This is going to be stood up perpendicular to the scale and epoxied in place between the two panels to act as a decorative divider, just as the original 1800s set of scales in the picture I'm modeling after had.
 So, I repeated this for the other side of the scale, and then I epoxied all of the panels in place.
 So, that is how it sat overnight while it set. Check back soon for Part 2!!!!
Leave a comment